How to add GPU passthrough support to QubesOS
I found a way to use GPU in your QubesOS VMs. Now cracking/rendering on Qubes might be more realistic than ever.
Please consider the security implications of this before trying.
Hashcat and John benefit a lot from having a GPU to work with, speeding up hash cracking by up to 500x compared to CPU.
Also you can use it for games, graphics or for running LLMs locally inside VMs
What makes it so much easier than the dedicated screen method is that VirtualGL lets a program render OpenGL content on a GPU and then sends the output to another machine. In this case, it’s used to offload the rendering to the secondary GPU and stream the frames back into the VM’s normal window in Qubes.
[ App inside GPU VM ]
      ↓
[ VirtualGL grabs rendered frame via EGL ]
      ↓
[ Sends it back into the AppVM’s X server ]
      ↓
[ Xen GUI proxy hands that image to dom0 ]
      ↓
[ You see it in a window like normal ]
Getting started
- You need to have both integrated graphics and a videocard
- You will need to ask dom0 to free your GPU, and your system will render dom0 and all other VMs using our integrated CPU graphics. Then your GPU will be free to be connected to the VM of our choice and all you will have to do is to take care of drivers and VirtualGL, which is easy.
You can only assign your GPU to one VM at a time in Qubes due to how Xen handles PCI passthrough
This guide will only describe the method for no dedicated screen.
Asking dom0 to give our GPU back
To use GPU on our VM, you need to take it from dom0. dom0 doesn’t actually use our GPU, and our GPU usually just sits idle, but dom0 won’t let us touch it. It’s because Qubes OS, by default, binds all hardware to dom0. If you don’t explicitly tell dom0 to ignore the discrete - GPU dom0 will grab it and won’t let you pass it to any VM.
You need to know your videocard’s device ID and make sure it’s not actively used, because if you hide the graphics that your system uses to render the GUI, you won’t have any display - just a black screen.
Run the following in dom0:
lspci -k | grep -A 3 VGA
You will get something like
00:02.0 VGA compatible controller: Intel Corporation Alder Lake-P GT1 [UHD Graphics] (rev 0c)
    Subsystem: ...
    Kernel driver in use: i915
    Kernel modules: i915
--
01:00.0 VGA compatible controller: NVIDIA Corporation ...
    Kernel driver in use: nouveau (or nothing)
    Kernel modules: nouveau
See nouveau? Here, dom0 touches our videocard, but doesn’t actually use it. dom0 uses only the processor, which has loaded kernel drivers here. It means it’s safe to hide our NVIDIA videocard. Do not try to hide the processor, as it is currently used.
You can see the device ID of our videocard being 01:00.0. It can also be in 0000:01:00.0 format, in this case you should only take the 01:00.0 part.
From here the guide assumes you use Nvidia, but if you use AMD Radeon you can just repeat the steps but use different drivers.
Now open grub config
sudo vim /etc/default/grub
It can look something like this:
GRUB_TIMEOUT=5
GRUB_DISTRIBUTOR="$(sed 's, release .*$,,g' /etc/system-release)"
GRUB_DEFAULT=saved
GRUB_DISABLE_SUBMENU=false
GRUB_TERMINAL_OUTPUT="console"
GRUB_CMDLINE_LINUX="rd.luks.uuid=luks-41b60e4e-9f82-4954-95f2-90794eb53c02 rd.lvm.lv=qubes_dom0/root rd.lvm.lv=qubes_dom0/swap plymouth.ignore-serial-consoles 6.6.48-1.qubes.fc37.x86_64 x86_64 rhgb quiet"
GRUB_DISABLE_RECOVERY="true"
GRUB_THEME="/boot/grub2/themes/qubes/theme.txt"
GRUB_CMDLINE_XEN_DEFAULT="console=none dom0_mem=min:1024M dom0_mem=max:4096M ucode=scan smt=off gnttab_max_frames=2048 gnttab_max_maptrack_frames=4096"
GRUB_DISABLE_OS_PROBER="true"
GRUB_CMDLINE_LINUX="$GRUB_CMDLINE_LINUX usbcore.authorized_default=0" <-- you need this one!
. /etc/default/grub.qubes-kernel-vm-support
Here you can see two GRUB_CMDLINE_LINUX lines, if you have that too you would only need to modify the latest one.
You need to append rd.qubes.hide_pci option, and specify your device ID you got from earlier. Again, it should be the device ID of your videocard that is not currently used by QubesOS. In our case, the modified line would look like this:
GRUB_CMDLINE_LINUX="$GRUB_CMDLINE_LINUX usbcore.authorized_default=0 rd.qubes.hide_pci=01:00.0"
The whole modified grub config will look like this:
GRUB_TIMEOUT=5
GRUB_DISTRIBUTOR="$(sed 's, release .*$,,g' /etc/system-release)"
GRUB_DEFAULT=saved
GRUB_DISABLE_SUBMENU=false
GRUB_TERMINAL_OUTPUT="console"
GRUB_CMDLINE_LINUX="rd.luks.uuid=luks-41b60e4e-9f82-4954-95f2-90794eb53c02 rd.lvm.lv=qubes_dom0/root rd.lvm.lv=qubes_dom0/swap plymouth.ignore-serial-consoles 6.6.48-1.qubes.fc37.x86_64 x86_64 rhgb quiet"
GRUB_DISABLE_RECOVERY="true"
GRUB_THEME="/boot/grub2/themes/qubes/theme.txt"
GRUB_CMDLINE_XEN_DEFAULT="console=none dom0_mem=min:1024M dom0_mem=max:4096M ucode=scan smt=off gnttab_max_frames=2048 gnttab_max_maptrack_frames=4096"
GRUB_DISABLE_OS_PROBER="true"
#                                           This hides the NVIDIA GPU from dom0 👇
GRUB_CMDLINE_LINUX="$GRUB_CMDLINE_LINUX usbcore.authorized_default=0 rd.qubes.hide_pci=01:00.0"
. /etc/default/grub.qubes-kernel-vm-support
After doing it, run the following to apply the config, and then reboot.
grub2-mkconfig -o /boot/grub2/grub.cfg
VM setup
I recommend creating a new StandaloneVM to use with GPU
Clone a debian template, I used debian-13 template and the instructions from now will be for debian-13
IMPORTANT: In “advanced”, uncheck “Include in memory balancing”, set Initial memory to around 4000 MiB, set virtualization mode to HVM, and set kernel to “provided by qube”
If you want audio on minimal templates, check out this post
In “devices” tab, add “VGA compatible controller… Then install Nvidia drivers using these instructions. For hashcat and other programs to work that rely on CUDA, install If your drivers are installed correctly, then Get the latest release here. Install with Now run Choose Now append Run your AppVM. Use Enable PRIME1 Then you can write a bash script to offload the command to the GPU, like VirtualGL would do2 I wish to express my gratitude to Drivers

sudo apt install nvidia-cuda-toolkit
nvidia-smi should display your GPU’s information VirtualGL
sudo apt install ./<filename>.deb
sudo vglserver_config
3, then no 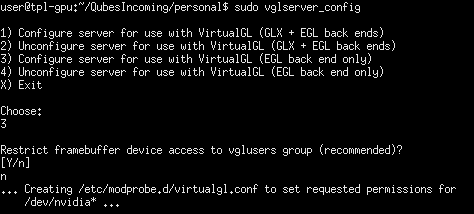
export VGL_DISPLAY=egl to /etc/profile withecho "export VGL_DISPLAY=egl" | sudo tee -a /etc/profile

Usage
vglrun wrapper whenever you need to use a GPU, or use vglrun bash to allow your GPU to be used for every command. PRIME (alternative, Nvidia only)
sudo apt install nvidia-xconfig
sudo nvidia-xconfig --prime
export __NV_PRIME_RENDER_OFFLOAD=1
export __NV_PRIME_RENDER_OFFLOAD_PROVIDER=NVIDIA-G0
export __GLX_VENDOR_LIBRARY_NAME=nvidia
export __VK_LAYER_NV_optimus=NVIDIA_only
exec "$@"
The End
bamboodabpen and the QubesOS community for finding a creative way to use VirtualGL, and to Neowutran for going through hell to set up the foundation of using GPU on Qubes in general.